Ah !! The classic, beautiful rose. When anyone would ask me when I was a kid what my favorite flower was, I’d always say rose. I don’t know why, exactly. Perhaps because my favorite color was red, and the classic rose was red. Anyway, I still love roses! Thankfully it’s fairly simple to re-create my favorite flower with a strip of paper, a quilling tool, and some glue. And today I’m going to share a tutorial showing how I make them !
To make a rose you need a strip of paper, a slotted quilling tool, and glue. The wider your paper is the larger your rose will be. For this example (and for the roses in the earrings shown above) I am using paper that is 3/8″ wide (9mm). I use a strip that is 6″ long. I can do up to 12″ long with this width of paper. With paper that is more narrow you will use a shorter length.

Start by inserting your strip of paper into your slotted quilling tool and roll it just a bit.

Fold the strip of paper backwards at a 90 degree angle, pressing the fold firmly. Continue rolling the paper, but at an angle so that it flares on the top and the bottom corner of the folded triangle portion stays touching the quilling tool.


Continue folding your paper and rolling, making sure the top flares out while the bottom always stays close to the quilling tool. When you have finished, take it off of the tool. It will unfold a bit as shown in the middle photo above. That is fine. Now it’s time to glue together your rose! Put a drop of glue on the bottom tab of the rose.

Put more dabs all the way up the rose. Then gently push the layers back together into a rose shape. The third photo above shows me turning the layers counter-clockwise to get it to look the best. Play around with it, adjusting it so that not all the corners are on top of each other.

Once you have the rose looking how you want it, add a bit more glue to the top layers. For this size rose I can just use this fine tip glue bottle. For a tiny rose using more narrow paper I add an extra fine metal tip to my glue bottle to get the glue into the tiny crevices. The finished glued rose is shown in the center photo above. Don’t worry if it seems like a lot of glue, it will soak into the crevices. The last photo shows the same rose when it has dried. It’s ready to be used in a variety of craft/art projects!
Some things you can use your paper quilled roses for:

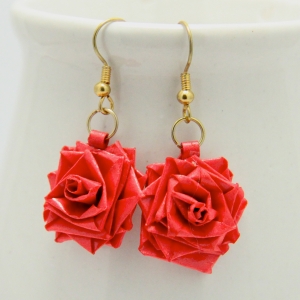
One thing you can do with your roses is turn them into gorgeous earrings!
Fold the strip of paper backwards at a 90 degree angle, pressing the fold firmly. Continue rolling the paper, but at an angle so that it flares on the top and the bottom corner of the folded triangle portion stays touching the quilling tool.
When you have rolled so that the folded triangle portion cannot be seen anymore it is time to fold your strip backwards again. Continue rolling.
Continue folding your paper and rolling, making sure the top flares out while the bottom always stays close to the quilling tool. When you have finished, take it off of the tool. It will unfold a bit as shown in the middle photo above. That is fine. Now it’s time to glue together your rose! Put a drop of glue on the bottom tab of the rose.
Once you have the rose looking how you want it, add a bit more glue to the top layers. For this size rose I can just use this fine tip glue bottle. For a tiny rose using more narrow paper I add an extra fine metal tip to my glue bottle to get the glue into the tiny crevices. The finished glued rose is shown in the center photo above. Don’t worry if it seems like a lot of glue, it will soak into the crevices. The last photo shows the same rose when it has dried. It’s ready to be used in a variety of craft/art projects!
Some things you can use your paper quilled roses for:
1. Earrings
2. Gift tags
3. Greeting cards
4. Name place cards
5. Notebooks
6. Magnet
7. Wedding table decorations
8. Anything that needs a little decorating!
2. Gift tags
3. Greeting cards
4. Name place cards
5. Notebooks
6. Magnet
7. Wedding table decorations
8. Anything that needs a little decorating!
No comments:
Post a Comment